カスタムコントロールではなくて、ウィジットというのでしょうか。
android.widget.Buttonを継承したクラスをライブラリにする手順のメモです。
# ここではButtonをつかってますが、他のウィジットでもやり方は一緒です。
環境はEclipse3.7です。
・androidプロジェクトを「アクティビティーの作成」のチェックを外して作成する。
・プロジェクトのプロパティでandroidの項目を選択し、ライブラリーの「Is Library」のチェックを入れる。
・resディレクトリー配下のファイル、ディレクトリーを削除する。
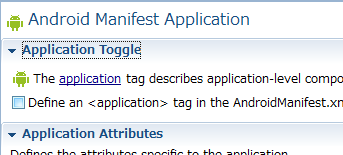
・androidManifest.xmlのアプリケーションタブにて「Define an <application> tag in AndroidManifest.xml」のチェックを外す。
・srcディレクトリーを右クリックしてクラスを追加。スーパークラスに「android.widget.Button」を指定する。
続いて使い方です。
今回は同一ワーキングスペースでのケースです。
・androidプロジェクトを新規に作成する。
・プロジェクトのプロパティでandroidの項目を選択し、ライブラリーの「追加」ボタンを押下で上記で作成したプロジェクトを選択する。
・自作ボタンクラスを継承したクラスを作成する。
public class exButton extends LibButton {
 public exButton(Context context, AttributeSet attrs)
 {
  super(context, attrs);
 }
}
・main.xmlにパッケージ名を含めたクラス名を利用してタグを記述する。
<com.feelg.android.androidLib.exButton
 android:id="@+id/exButton01"
 android:layout_width="fill_parent"
 android:layout_height="wrap_content"  />
以上で使えました。
まだまだ勉強不足です。